Sitemize üye olarak beğendiğiniz içerikleri favorilerinize ekleyebilir, kendi ürettiğiniz ya da internet üzerinde beğendiğiniz içerikleri sitemizin ziyaretçilerine içerik gönder seçeneği ile sunabilirsiniz.
Sitemize üye olarak beğendiğiniz içerikleri favorilerinize ekleyebilir, kendi ürettiğiniz ya da internet üzerinde beğendiğiniz içerikleri sitemizin ziyaretçilerine içerik gönder seçeneği ile sunabilirsiniz.
Üyelerimize Özel Tüm Opsiyonlardan Kayıt Olarak Faydalanabilirsiniz

Mutlu

Eğlenmiş

Şaşırmış

Kızgın

Üzgün

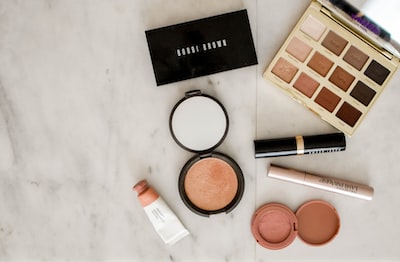
Welcome to the ultimate guide for flawless makeup application! Whether you’re a makeup enthusiast or a newbie looking to master the art, this blog post will provide you with all the tips and tricks you need for a picture-perfect look. From prepping your skin to setting your makeup for longevity, we’ll cover every step of the process. Discover how to choose the right foundation shade, enhance your eyes, create perfectly sculpted brows, achieve a natural flush with blush, and master the art of highlighting and contouring. Get ready to elevate your makeup game and step out with confidence!
When it comes to achieving a flawless look with makeup, prepping your skin is the first step you should never skip. Properly prepping your skin not only helps your makeup go on more smoothly but also ensures that it lasts all day long. So, let’s dive into some essential prepping steps that will help you achieve a perfect canvas for your makeup.
Firstly, cleanse your face using a gentle cleanser to remove any dirt, oil, or impurities accumulated on your skin. This step is crucial as it helps to create a clean surface for your makeup application.
Next, exfoliate your skin to remove dead skin cells and reveal a brighter complexion. You can use a gentle scrub or a chemical exfoliant depending on your skin type. Exfoliating helps to smooth out any rough patches and allows your foundation to glide on seamlessly.
After exfoliation, it’s important to hydrate your skin using a moisturizer that suits your skin type. Hydration is key to maintaining a healthy skin barrier and prevents your makeup from looking cakey or clinging to dry patches. Choose a moisturizer that is lightweight, non-greasy, and absorbs quickly into the skin.
| Skin Prepping Tips: | Product Recommendations: |
|---|---|
| 1. Cleanse your face | Gentle Cleanser: Cetaphil Daily Facial Cleanser |
| 2. Exfoliate your skin | Chemical Exfoliant: The Ordinary Glycolic Acid 7% Toning Solution |
| 3. Hydrate your skin | Lightweight Moisturizer: Neutrogena Hydro Boost Gel-Cream |
| 4. Prime your skin | Matte Primer: NYX Professional Makeup Shine Killer |
| 5. Protect your skin | Sunscreen: La Roche-Posay Anthelios Clear Skin Sunscreen SPF 60 |
| 6. Use a setting spray | Makeup Setting Spray: Urban Decay All Nighter Setting Spray |
Remember, prepping your skin is the key to achieving a flawless makeup look. By following these simple steps and using the right products, you can create a smooth and radiant canvas for your makeup application. So, take the time to give your skin the love it deserves, and watch your makeup game elevate to a whole new level!
When it comes to achieving a flawless look, one of the most crucial steps is choosing the right foundation shade. We all know the struggle of finding the perfect match for our skin tone, but fear not, I’m here to share some tips and tricks to make this process a whole lot easier!
1. Know Your Undertone: Before diving into the world of foundations, it’s important to determine your undertone. Are you cool, warm, or neutral? One way to figure this out is by looking at the veins on your wrist. If they appear blue, you have a cool undertone. If they’re greenish, your undertone is warm. And if you can’t really tell, you’re probably neutral. Knowing your undertone will help you narrow down your options and find a foundation that will truly complement your complexion.
2. Test, Test, Test: Don’t be afraid to test out multiple shades before making a final decision. The best place to swatch foundations is along your jawline, as it allows you to compare the color to your neck and face. Be sure to step outside and check how the shade looks in natural lighting, as artificial lighting can be deceiving. It’s also worth trying out samples or mini sizes of different foundations before investing in a full-sized product.
3. Seek Professional Help: If you’re still unsure about which foundation shade suits you best, consider visiting a beauty counter or makeup artist for a professional consultation. They have the expertise to match your skin tone with the perfect foundation and can offer personalized recommendations based on your unique needs. Plus, they can provide additional makeup tips and tricks to help you achieve a flawless finish.
| PROS | CONS |
|---|---|
|
|
Remember, finding the right foundation shade may require some trial and error, but once you discover the perfect match, it will make all the difference in achieving a flawless and natural-looking complexion. So don’t give up, keep experimenting, and embrace your beautiful self!
Hey there beauty enthusiasts! Today, we’re going to talk about enhancing your eyes and taking them from ordinary to extraordinary. Whether you have big doe eyes or sparkling orbs, there are many makeup tips that can help you achieve a flawless look. So, grab your eyeshadow palettes and let’s dive right in!
First things first, let’s talk about the importance of a good eye primer. Applying an eye primer before your eyeshadow not only helps it stick and last longer, but it also intensifies the color payoff. A little goes a long way, so make sure to apply a thin layer all over your lid and blend it in using your fingertips or a brush.
Now that your base is ready, it’s time to decide on the eyeshadow shades. For everyday looks, neutral shades like browns, taupes, and bronzes work beautifully. If you’re feeling adventurous, you can experiment with pops of color or glittery shadows. The key is to choose colors that complement your eye color and skin tone.
Next up, let’s talk about the tools of the trade – eyeshadow brushes. Investing in a good set of brushes can make all the difference in achieving a seamless and blended eye look. A fluffy blending brush is a must-have for diffusing the eyeshadow in the crease and creating a gradient effect. A smaller, more precise brush comes in handy for applying eyeshadow on the lower lash line or for detailed work.
| Brush | Use |
|---|---|
| Fluffy Blending Brush | Blending and creating a seamless transition |
| Precision Brush | Detail work and precise application |
| Flat Shader Brush | Packing on color to the lid |
Once you have your eyeshadow and brushes ready, it’s time to apply the magic! Start by applying a transition shade slightly darker than your skin tone to the crease using the fluffy blending brush. This creates a soft base and helps blend other eyeshadow colors seamlessly. Then, go in with your chosen lid shade and pack it onto the lids using a flat shader brush. Blend any harsh lines with the blending brush for a polished look.
Are you tired of unruly and untamed eyebrows? Do you want to achieve that flawless look with perfectly sculpted brows? Well, you’ve come to the right place! In this blog post, we will be sharing some fantastic makeup tips to help you create the brows of your dreams.
First and foremost, let’s talk about the importance of choosing the right eyebrow shape for your face. Just like how different foundation shades work best with different skin tones, your eyebrow shape should complement your unique face shape. So, before you start plucking or filling in your brows, take a moment to examine your face shape. Whether you have a round, oval, square, or heart-shaped face, there’s a brow shape that’s perfect for you!
Next, it’s time to choose the right tools for the job. To achieve those perfectly sculpted brows, you’ll need an angled eyebrow brush, a spoolie brush, and an eyebrow pencil or powder. The angled brush will help you fill in your brows with precision, while the spoolie brush will blend everything together for a natural look. Don’t forget to pick a color that matches your hair color for a seamless finish.
Once you’ve filled in your brows to perfection, it’s time to set them in place. Using a clear or tinted brow gel, comb through your brows in an upward motion to keep them in shape throughout the day. This step is especially important if you have naturally unruly brows or live in a humid climate.
| Product Recommendations: | Price |
|---|---|
| Anastasia Beverly Hills Brow Wiz | $21 |
| Benefit Cosmetics 24-Hour Brow Setter Gel | $24 |
| Maybelline Brow Drama Sculpting Brow Mascara | $7.99 |
Remember, practice makes perfect when it comes to creating perfectly sculpted brows. Don’t get discouraged if your first attempt isn’t exactly what you envisioned. With time and patience, you’ll become a pro at achieving the brows of your dreams. So go ahead and embrace the power of beautifully sculpted eyebrows!
When it comes to achieving a natural flush with blush, there are a few key tips and tricks to keep in mind. Blush is a crucial step in any makeup routine as it adds a pop of color to the cheeks and can instantly brighten up the face. However, finding the right shade and applying it correctly can be a bit daunting. But fear not, with a few simple techniques, you can achieve a flawless look that gives you that perfect glow.
Choosing the right blush shade: The first step in achieving a natural flush is to choose the right blush shade for your skin tone. It’s important to consider the undertones of your skin when selecting a blush. If you have warm undertones, opt for peachy or coral shades, while cool undertones pair well with rosy or mauve tones. Additionally, those with a deep complexion can go for deeper shades like plum or berry. Experiment with different shades to find the one that complements your complexion the best.
Application techniques: Once you have found the perfect shade, it’s time to apply the blush to your cheeks. One popular technique is to smile and apply the blush to the apples of your cheeks in a circular motion. This gives a natural, flushed look that mimics a gentle blush. Another technique is to apply the blush slightly higher on the cheekbones for a more sculpted effect. Remember to blend the blush well to avoid any harsh lines or patches.
| Makeup Tips for a Natural Flush: | |
|---|---|
| 1. Use a fluffy brush: | Using a fluffy brush allows for a more diffused application, giving a softer and more natural look. |
| 2. Build up the color: | Start with a light hand and gradually build up the color to avoid applying too much blush at once. |
| 3. Consider your overall makeup look: | The blush shade should complement your overall makeup look. If you’re going for a bold lip, opt for a softer blush shade, and vice versa. |
Setting your blush: To ensure your blush lasts all day and stays in place, it’s important to set it with a powder. Using a translucent powder, lightly dust it over your cheeks to lock in the color. This step will help your blush stay vibrant and prevent it from fading throughout the day.
By following these simple tips and techniques, you can achieve a natural flush with blush that gives your complexion a healthy and radiant glow. Experiment with different shades and application techniques to find what works best for you and your desired look. Don’t be afraid to play around and have fun with blush, as it can truly enhance your overall makeup look.
Hey beauties! Today, I want to talk about a makeup technique that has taken the beauty world by storm – highlighting and contouring. If you want to achieve a flawless look and enhance your natural features, then mastering the art of highlighting and contouring is a must!
So, what exactly is highlighting and contouring? Well, it’s a technique that involves using lighter and darker shades of makeup to create dimension, shape, and definition on your face. Highlighting is all about bringing certain areas forward, while contouring is about creating the illusion of shadow and depth.
Now, let’s dive into some makeup tips to help you ace highlighting and contouring like a pro. Firstly, it’s important to choose the right shades for your skin tone. Using shades that are too light or too dark can look unnatural, so take the time to find the perfect match for your complexion.
When it comes to highlighting, focus on areas that you want to bring forward and emphasize. This usually includes the high points of your face such as the cheekbones, the bridge of your nose, the cupid’s bow, and the brow bone. Apply a lighter shade of foundation or concealer to these areas and blend it out for a seamless finish.
| Makeup Tips for Highlighting and Contouring: |
|---|
| 1. Choose the right shades for your skin tone. |
| 2. Focus on highlighting the high points of your face. |
| 3. Contour the hollows of your cheeks, temples, nose, and jawline. |
| 4. Blend, blend, blend for a seamless finish. |
| 5. Use a light hand and build up the intensity gradually. |
Another important tip is to blend, blend, blend! Blending is the key to achieving a natural and flawless look. Use a clean brush or makeup sponge to blend out any harsh lines and ensure a seamless transition between your highlight and contour.
Remember, less is more when it comes to highlighting and contouring. It’s always better to start with a lighter hand and build up the intensity gradually. This way, you can avoid going overboard and ending up with a muddy or artificial-looking finish.
So, there you have it – some makeup tips to help you master the art of highlighting and contouring. With a little practice and the right products, you’ll be able to achieve a beautifully sculpted face and turn heads wherever you go. Stay flawless, my friends!
Setting your makeup is an essential step in achieving a flawless look that lasts all day. Whether you’re attending a special event or simply want your makeup to stay put throughout the day, setting products are your best friend. Here are a few tips to ensure your makeup stays fresh and in place from morning until night.
Invest in a good setting spray: A setting spray is a game-changer when it comes to making your makeup last longer. Look for a setting spray that is specifically formulated to lock in your makeup and provide a long-lasting finish. After you have applied your makeup, simply mist the setting spray all over your face to set everything in place.
Use a loose setting powder: Another excellent way to set your makeup is by using a loose setting powder. This will help to mattify your skin and prevent your foundation and concealer from creasing or melting off throughout the day. Take a fluffy brush and gently dust the powder all over your face, focusing on areas where you tend to get oily.
Prime your eyelids: To ensure your eyeshadow stays vibrant and crease-free, it’s important to prime your eyelids before applying any eyeshadow. Use an eyeshadow primer or even a small amount of concealer to create a smooth base for your eyeshadow. This trick not only locks in your eyeshadow but also helps to intensify the color and prevent fading.
If you follow these makeup tips and incorporate setting products into your routine, you can ensure that your makeup stays put and looks fresh all day long. So, go ahead and enjoy your day without worrying about touch-ups!
How can I prep my skin before applying makeup?
Before applying makeup, make sure to cleanse and moisturize your skin. This will create a smooth canvas for your foundation and help your makeup last longer throughout the day.
How do I choose the right foundation shade for my skin tone?
To choose the right foundation shade, determine your undertone (warm, cool, or neutral) and test shades on your jawline in natural light. The shade that seamlessly blends with your natural skin color is the best match.
What are some tips for enhancing my eyes with makeup?
To enhance your eyes, use eyeshadows in complementary shades to your eye color. Apply eyeliner close to the lash line and curl your lashes before applying mascara for an added lift.
How can I create perfectly sculpted brows?
To create perfectly sculpted brows, use a brow pencil or powder to fill in any sparse areas. Define the shape of your brows by following your natural arch and brush them upward for a more polished look.
What is a natural way to achieve a flush with blush?
For a natural flush, smile and lightly apply blush to the apples of your cheeks. Blend it out towards your temples using circular motions to achieve a seamless and natural look.
What is the technique for highlighting and contouring?
To highlight, apply a lighter shade of concealer or powder to the high points of your face such as the tops of your cheekbones, bridge of your nose, and cupid’s bow. Contour by using a darker shade to define your cheekbones, jawline, and sides of your nose.
How can I set my makeup for longevity?
To set your makeup, use a setting spray or translucent powder. Lightly mist or dust it over your face to help your makeup stay in place and reduce shine throughout the day.
Makeup Tips for a Flawless Look


Yorum Yaz